
What Makes a Good Photograph?
Important Guides
Photography Instruction
I see, literally, hundreds of black & white photographs every day, being the Administrator of the Black & White Photographers Facebook group. I see photos of all kinds. Some of them are incredible. Many of the others could be very good if the photographer would just follow a few simple rules.
It has never been easier to create a good photo. Modern day digital cameras do a very good job of setting the exposure. Many people are using their cell phones to get excellent photographs. Cell phone cameras are the modern-day Kodak Brownie camera. Everyone has one! So, if the camera is doing most of the work for the photographer, why isn't every photograph excellent?
There are three things you should be aware of when you take a photo. In fact, every photo is made up of these three things. To help you remember them, I call them, the Photo Triangle.
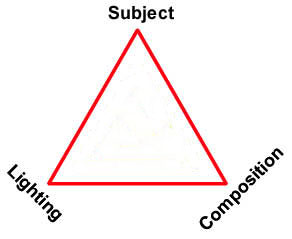
Subject
Each of the three sides of the Photo Triangle is as important as the others. Let's start with the subject. I have done just about every kind of photography there is. There are some kinds that I enjoy and some that I don't. What is it you enjoy photographing? Family, landscapes, cityscapes, friends? I want to encourage you to strive to make every photograph the best it can be no matter what it is you are photographing..
The late John Derek, husband of super model and actress Bo Derek, was an accomplished fashion photographer. He once said, "My photographs are only as good as my subject!" We may not always have the choice to photograph the most beautiful subject whether it is people, landscapes, cars, buildings, etc. All subjects are beautiful in ways and it is our job, as the photographer, to find that beauty and bring it out in our photographs. The late Don Blair was one of the world's greatest portrait photographers. Someone once asked Don, "What do you do when you have to photograph an ugly girl." Don replied, "There are no ugly girls!"
This is same with every subject. For example, a car may be more beautiful from a certain angle than from a different angle. Landscape photography is the same. While we can't move the landscape, we can move around and look for different angles that are more appealing to the eye. Balanced Rock in Arches National Park in Utah, to me, is beautiful from this angle but I have shot it from other angles that just don't work for me.
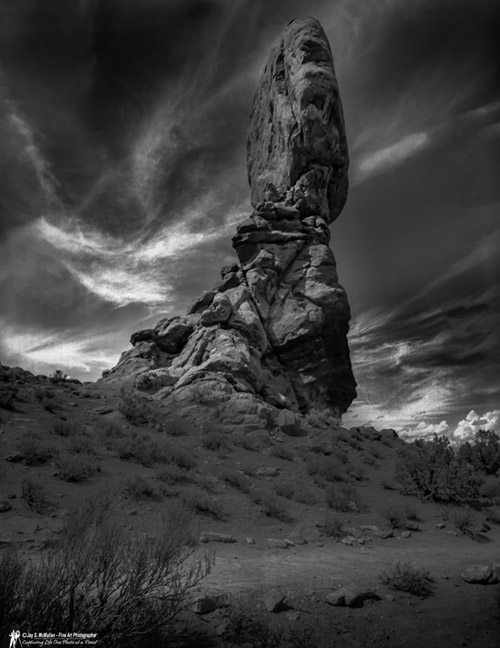
I was blessed with an incredible sky and some great lighting when I took this photo. Imagine if I would have just taken a snapshot of this instead of taking the time to make a great photo. Always look for something beautiful in any subject you photograph. Look for lines, curves, shapes, etc.
Photograph subjects that you know and understand. I talked to a man once who loved photographing barbed wire back in the Texas Panhandle. If you are passionate about a subject then there is a good chance your photography is going to reflect that. What is it that you love to photograph? What is your passion? Are you photographing what you love?
Lighting and Exposure
You can have the greatest subject in the world but if there is no light on the subject, the whole photo is void and useless. Modern-day digital cameras, including cell phone cameras, do a fairly good job of controlling exposure. There are times that the photographer will need to control the exposure to get a good photo but for this lesson, we'll let the camera do all of the work.
If you are photographing a friend and the sun is to her back, the resulting photo will, most likely, be underexposed. The background may be perfectly exposed but your friend's face may be too dark to see. Portrait photographers use expensive studio lighting to light their subjects for portraits in the studio. Any portrait photographer worth their salt will not use a single, camera mounted flash to take portraits. If you are taking photos of people using a single flash, if you can, remove the flash from the camera and put it an angle to your subject. If you can't move the flash, try bouncing the flash off of the ceiling to soften the light and the shadows. You can also use diffusers or reflectors on your flash to soften the light. The larger the reflector, the softer the light will be. Something as simple as holding a white handkerchief over the flash will make quite a difference in the photo.
When taking portraits of people outdoors, try to place them in open shade. If you photograph them in open sunlight, the light is too harsh and may leave unwanted shadows. Watch out for shadows that cross people's faces. When taking portraits outdoors, reflectors can be used to change the lighting on your subject's face. They are relatively inexpensive and will make a huge difference in the quality of your portraits. A piece of white poster board held close to the face but out of range of the lens will add light to your subject. A piece of black poster board will darken the side of the subject's face. Simple little tricks are what separate the "men from the boys" in photography.
If you are shooting landscapes, the lighting will be vastly different at various times of day. Try shooting a landscape subject at different times of day. My wife and I went out for a day trip to look for things to photograph. I found a couple of great old houses to photograph. The only problem was that the angle in which I wanted to photograph them put me facing directly into the sun. I could have photographed them as they were but the sky would have been washed out. I chose to drive the 45 miles again four days later, earlier in the day so the early morning sun would give me better lighting.
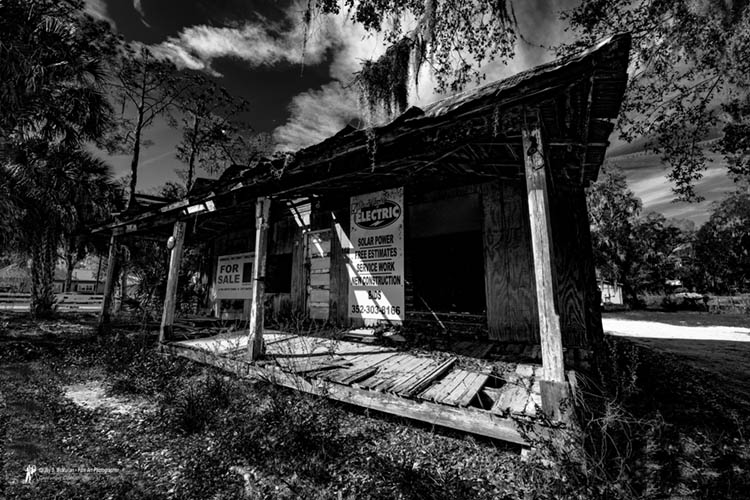
Instead of the sky being washed out, you can see how the details really popped in the sky along with the old house. Isn't this much better than just shooting a snapshot? A little planning and thinking is all it takes to make a good photograph.
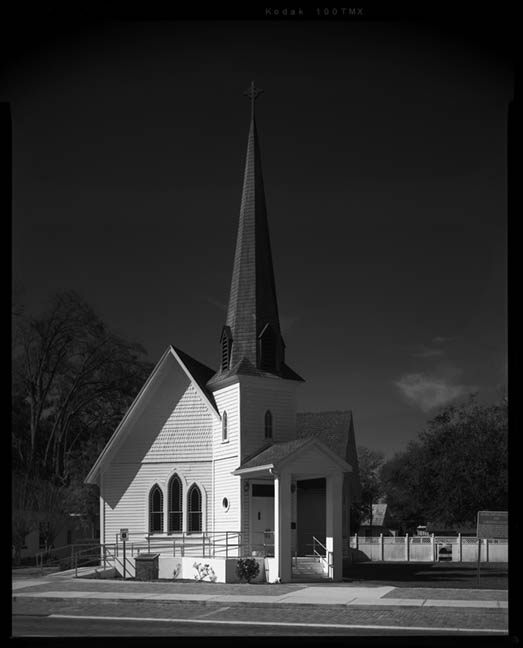
There is a historical church a couple of miles from my home. I wanted to get a photo of the church with a rich, dark sky. In order to get the shot I wanted, I needed to photograph it before noon. The church faces east so the morning sun is the best lighting. I went back every day, with my 4x5 view camera, for three weeks until I finally saw the sky I wanted and this is what I got.
Composition
Composition is what kills most photos! As a photographer, I strongly encourage you to study the rules of composition. They are the same for paintings as they are for photography. Composition is basically, making an image that is pleasing to the eye.
I am absolutely amazed at how many photos I see where the horizon is crooked. Horizon comes from the word "horizontal." Have you ever seen a sunrise or a sunset with a crooked horizon if you aren't on slanted ground? It is so simple to hold the camera level. Bubble levels are very inexpensive and some are made that will slide into the hot shoe on your camera. What do you do if you take a fantastic shot but the horizon isn't straight? You can always straighten it with photo editing software like Photoshop.
Almost every incredible photograph has been post-processed with some kind of photo editing software. Before digital imaging, we took photos with negatives and then we printed those negatives in the darkroom. Post-processing is equivalent to working on a photo in the darkroom. Once you want to take your photography to the next level, you will almost certainly have to learn how to post-process your photos.
In photography, as well as in painting, drawing, etc, there is a thing called the "Rule of Thirds." Imagine dividing your scene into nine parts using two horizontal lines and two vertical lines. To be most pleasing to the eye, it is important to place your subject along these lines and intersecting points. Don't put the horizon in a photograph of a sunset, right across the middle of the photo. That is something I see quite often. In a photo of a sunset, place the horizon along the lower horizontal line or, if there is something interesting in the foreground, try placing the horizon along the top horizontal line.
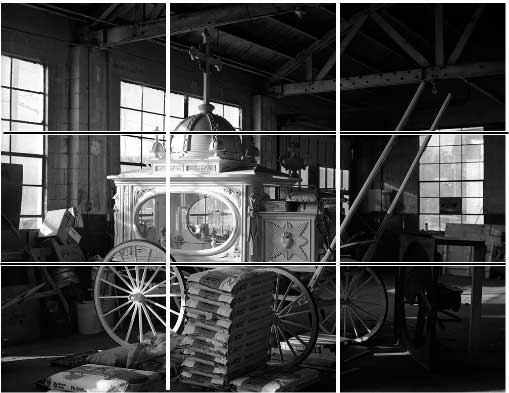
The photo above is a hearse for small children with the rule of thirds drawn on the photo. I ran across the hearse in a feed store in Alvin, Texas. Notice how the back wheel sits very close to the bottom, left, intersecting point and the bottom of the wagon extends along the lower horizontal line.
Don't cut things off! Many people would cut the thills, or the poles that are used to attach the wagon to a horse, off and many people would cut off the cross on top. All of those things are necessary parts of this photograph and should be shown. With most digital cameras these days, what you see through the viewfinder is exactly what you will see on your finished photograph. Stop and take some time to see what you are actually looking at. The medium of photography is all about seeing! When you see your final photo, you will thank me! With that being said, try filling your frame with your subject, eliminating noisy surroundings.
If you are taking a portrait of a person and their head is turned to the side, make sure to keep more room in front of their face than behind them. If you are photographing a moving object, like a car, leave more room in front of the car than behind. There is something about our brains that want to see that an object has somewhere to go when it is on the move. None of these rules are new. They have been the same as long as man has created art and will be here as long as man remains.
Look for the rule of odd numbers. Our eyes are more pleased when we see a photo with an odd number of subjects, one, three, five,etc. Photographing two main objects in a photo is hard to satisfy where each of those subjects needs to be. If you do have even numbers of items, offset them from each other.

When shooting a photo with two subjects, or items, photograph them from a place where one object is higher than the other or further away from the other which will give your photo a feeling of depth as you see in the photo above.
The biggest majority of people using cell phones take their photos in a "portrait" or vertical orientation. Learn when to use the portrait orientation or when to use the "landscape" orientation. This is a big one to me! If you are taking portraits of a single person, portrait mode is great but if you are taking a portrait of a group of people, whatever you do, do not use the portrait orientation.
Know when to use color and know when to use black & white. With digital imaging, color images can easily be turned into black & white with great results. If you have stepped deeper into the photography matrix and you have a camera that will shoot in "RAW," use it! You can set your camera to take black & white photos but still have your RAW images with all of the color information. That is a little deeper than we need to get in this lesson but always remember that.
Use color when colors are important to a photo. For example, sunrises and sunsets should almost always be made in color. If you go to a hot air balloon festival that has dozens of beautifully colored balloons, use color. If you are wanting to emphasize textures and tones, use black & white.
There are times you may even want to finish a photograph in monochrome. A monochromatic image is one where the photo is made up of varying shades of one color. Many people gets these terms mixed up. Even well meaning, and sometimes professional photographers use the wrong terms. A black & white photo is an image without any color whatsoever and is made up of varying shades of gray from white to black. To make a photograph appear to be old, it can be sepia toned to give it that yellowish-brown tint. Before digital imaging was created, to change the tone of a black & white photograph, we had to use chemicals. If I remember correctly, sepia toning was a two-step process. I never really liked the look so I didn't do it that often and that has been at least thirty-five years ago. I used to use selenium to tone many of my black & white prints for permanence. The selenium toning replaces the silver in a black & white print. The selenium will not tarnish like silver and therefore, the print will last longer. When done just for permanence, no color change will be seen in a black & white print. But, if you mix the selenium toner in a more concentrated mix, it will give the print brown tones. Gold toning gave prints a blue cast that I was never fond of so I never used it. These can be replicated with a digital image but by doing so, the black & white image turns into a monochromatic image because of the colors..
Remember, a monochromatic image is made up of multiple shades of one color and only one color. If the whole image is made up shades of brown and there is one little spot of blue, it is not a monochromatic image. If there are two colors in the image, it is dichromatic. If there are more than two colors, the photo is polychromatic.
This are all we will cover for now but please do a search online for rules of composition. This is one of the best suggestions I can give to you if you want to up your game as a photographer.
If you are going to be a good photographer, you need to stop taking snapshots! My three year old grandson can take snapshots and to be honest, they are as good as some photos I see posted online.
My daughter picked up her phone the other day and found three selfies that my grandson had taken. This is one of them.

After my wife and I stopped laughing, I thought this would be a great example to teach people to take good photos! You may not believe this but I have seen photos this bad that were posted on Facebook.
I want you to pull up one of your photos. We are going to make an honest critique of my grandson's selfie and I want you to look at each thing we critique, in your photo.
What is the first thing you see that could be better? I think most people would automatically say, "His chin is cut off in the photo." You would be correct. Don't cut off important parts of a photo. Look at your photo. Do you see anything important to the photo that was cut off?
The next thing I see is the lighting is terrible. It is obvious that when he clicked the button to take the photo, a single flash went off leaving bright highlights in the middle of his pupils. A single point light source also gives very flat lighting which is not pleasing in portraits. What do you see in your photo. Is the lighting coming from straight on into your subject or, are there shadows? In photography studios, we use a "fill light" to soften shadows that come from our "key light" or "main light." Shadows give depth to a photo but you don't want the shadows to be too dark where there is no detail in that part of the photo.
Another thing I notice is the photo is not sharp. He was too close to the camera for it focus properly Another thing you will want to study if you want to be a serious photographer is "depth of field." When photographing people or animals, always focus on the eyes. "The eyes are the window to the soul." They need to be sharp.
By changing your depth of field, you can make everything in the foreground all the way through the background, be in focus. Or, you can leave your subject sharp and blur the background which puts more emphasis on your subject. Some cameras have "depth of field preview buttons" that will stop the lens down so you can see a better representation of what will be in focus, and what won't, in your photo. What is sharp in your photo and what isn't?
The last thing I will critique in this photo is the background. If I were taking a portrait, even in simple portraits of family members, I would never choose this background. At least move your subject in front of a curtain or sit them at a desk with a bookshelf behind them. Use some kind of background that accentuates the photo. You may even be able to move your position to make the photo have a better background. If you are shooting a photo of, let's say, a beautiful bouquet of flowers. For goodness sake, don't take a photo of the bouquet with someone's car in the background! Does the background in your photo accentuate your subject? Be honest with yourself as you critique your photos. Ask someone that you feel is a better photographer than you, to critique your photos. You will learn and grow as a photographer when you do this.
Important Guides
How We Detect Color in Posted Images and How You Can Fix You Image
Why Was My Photo Deleted from BLACK & WHITE Photographers on Facebook?
Monochrome is NOT Black & White and Black & White is Monochrome
Photography Instruction
Mastering the View Camera by Jay S. McMullan in PDF
What Makes a Good Photograph?
Click Here to go to My Home Page
|