As with any endeavor, the right tools can greatly simplify ANY task. When you are starting out building your own RC plane, it may not be economically feasible to purchase all of these tools. I have accumulated many of my tools over the years. Some have come in more handy than others.
First things first. You are going to need some hobby knives. X-Acto is probably the most well known manufacturer of hobby knives. If you don't already have any hobby knives, I would recommend buying a set that has two or three different types of knives with assorted blades. The prices are not too expensive and the knives will last you for years. Don't be overly concerned about buying name brand knives either. I have found inexpensive hobby knive sets at Harbor Freight and on Ebay. Go ahead and buy extra blades for the knives. I am guilty of not changing blades when I should. I'll use a blade until it is so dull it will barely cut butter. Buying blades in bulk, say, 20 or 100 blades to a package will insure that you don't run out at an inopportune time. There is nothing worse than having to find a hobby shop when you are right in the middle of building.
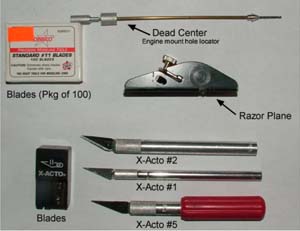
Photo 1 shows the three popular hobby knife sizes. Under most circumstances, I use a #1 with #11 blades. The package of blades in the top left has 100 blades. That should be enough to get through a rather large RC kit.
Razor Plane
|
Photo 2. Click to see a larger image. |
How many times do you go to the flying field and see someone's airplane that has a fuselage that looks like a square box? Most RC airplanes use triangle shaped balsa strips in the corners, lengthwise in the fuselage. The purpose of this triangle stock is twofold. First, it give more glueing surface for the top, sides and bottom of the fuselage to hold together. Second, is so that the shape of the fuselage can be rounded and not be so square!
When I was younger, once I found out that the fuselage wasn't supposed to be square and that is was much prettier rounded off (a lot smoother aerodynamically too), I would take my pocket knife and round the fuselage. i could never get the trim job neat though. it always ended up being very wavy and took lots of sanding to fix. When I found the razor plane, I found one of the most useful tools in my arsenal! The razor plane makes quick work of fuselage sides and wing leading edges leaving very little room needed for a lot of sanding. Using the razor plane is the most fun I have in building an RC plane. If you have never used one, try it,,,you WILL like it! X-Acto makes a razor plane and so do several other manufacturers. I use one made by Stanley that I purchased at Wal-Mart. Keep the blade sharp and it will be easy to use.
Sand Paper and Sanding Blocks, Tees and Fillers
Taking your time with lots of sandpaper is what will make the difference in the looks of your airplane. The smoother the finish, the more aerodynamic it will be too.
The lower the number of the grit on the sandpaper, the more course it is. For example, 150 grit paper will be more course than 220 grit paper. Start with course papers and work your way to finer grit. There are several different kinds of sandpaper. I would recommend trying different kinds until you find something you are comfortable with.
I bought a 36 inch belt sander from Harbor Freight for around $60. This is one of the tools I would not part with. It makes many sanding chores much easier. I normally use 180 grit paper in the belt sander. Also, an orbital or palm sander sure makes life easier, especially when finishing a fuselage that has been fiberglassed. I will discuss fiberglassing balsa surfaces later in this series on designing and building. After I have fiberglassed the fuselage on my plane, I spray a coat of quick drying auto primer. After it has dried, I put "wet or dry" sand paper in my orbital sander and sand off the high spots, being careful not to sand through the .56 ounce per square yard fiberglass clothe. I continually wet the sandpaper to keep the grit clean. I will go through this process of priming and sanding about three times to get a beautiful finish on my plane. I will go through several sheets of paper before i am finished. Wet or dry sandpaper is found at auto paint stores. They will have varying grits, all the way to VERY fine grits.
Sanding blocks are good to have around for sanding smaller areas. These can be purchased at any hardware store. For larger or longer surfaces like fuselage side edges and wing leading edges, use a sanding tee (a piece of aluminum shaped in a T). They are available in different lengths from hobby shops. You can also make inexpensive sanding blocks to any length you need by cutting a 2x4 on a table saw. Use spray on contact cement to glue the sandpaper to the sanding block and then trim the paper to the same size as your block. For long, narrow blocks, you can buy rolls of sand paper and emory cloth at hardware stores and auto paint stores.
Change your paper frequently. If you use fresh paper, it will make your sanding chores easier and faster.
I have not tried them but I understand Perma Grit makes some sanding tools that do not clog and can be used repeatedly without wearing out. This would certainly be something to look into and could save you some money in the long run.
Hobby Saws
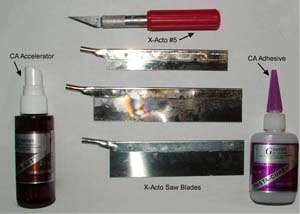
In Photo 2, you see three different style hobby saws. They are all designed to fit into an X-Acto #5 type knife handle. I usually use them without putting them in the handle. I forget the exact name used for this type of knife when the blade is permanently affixed to the handle, but I have seen them at Harbor Freight and I would imagine that Home Depot and Lowes and maybe even Sears would have them. You need at least one of these saws.
Drill and Drill Bits, Drill Press
You are going to need a drill if you are going to build an RC plane. There is no way around it. I have tried cordless drills and it seems I am always looking for the charger because the battery is dead. For me, a regular old drill with a cord is the only way to go. A drill press would be a good tool to have to make sure your holes are straight. You can buy table top drill presses or full size presses. I bought a drill press that my regular drill fits into. It has worked flawlessy. When I don't need it, it is put up, out of the way. Any good set of drill bits should work well for you too.
Engine Mount Hole Locator
This is one of those tools that I don't know how I got by without! I can remember struggling, trying to mark the location for the mounting screws on my RC engines. What a pain that was until this fancy little tool came out (See Photo1). All you do is place your engine in the engine mount where you want it and then slide the small, cone shaped locator into the mounting hole on the engine's crankcase, then push the drill down and turn to mark and drill a starter hole. Somebody was really thinking on this one! If I ever meet the man that thought of this, I want to buy his dinner! The tool also comes in handy for man other things, noteably, drilling out the holes in servo arms. If you have ever put a push rod onto a servo arm you will know that the holes are not big enough. The engine mount hole locator's drill is the perfect size for this. Another tool that will do the same thing but allow you to change drill bits is a pin vise. Davis Diesel Development and other hobby retailers have them available. They are not so good for marking engine mount holes though.
Trust me, buy you one of these engine mount locators. You won't be sorry. I've had mine for years and it works as well as the day I bought it! I would also recommend a pin vise but not as much as the engine mount hole locator.
Bench Saw
I had a nice 10 inch table saw that I used a lot when I was building model planes. When I moved to Florida in December 2008, I had to get rid of some things and I sold my table saw. Man, did I miss it, especially when I started building my Extreme Kaos design, especially when I was trying to cut the plywood firewall and bulkheads. I wanted the benefits of a table saw but wanted something that didn't take ups as much room so I decided on a bench saw. It is basically a table saw without the huge, heavy stand. I found an excellent Delta brand saw for $50 at a second hand store. You can find them frequently on the web on sites like Craigslist and in the newspaper classifieds. A brand new bench saw for less than $150 at Lowe's.
Band Saw
Now here is a tool I wish I had! I had one when I lived in Salt Lake City. It was given to me and I think I know why. It would not keep the blades on. They would jump off and break. The band saw can be used to cut wing ribs, wing tip blocks and lots of other things. My wife and I are looking to buy a home and when we get in, I'm buying a band saw for my shop!
Dremel Tool
Here is a tool that is very handy to have around. I bought a Black and Decker tool that is similar to the Dremel at a Home Depot. It uses Dremel accessories. I use it mainly with a cut off wheel for cutting music wire and throttle cables. Without it, good luck cutting this stuff! Believe me, it really is worth the money to have one of these or at least, borrow one when you build an RC plane.
Allen Wrenches - Metric and SAE
When you buy wheel collars, they normally come with an allen wrench. I always end up stripping the allen wrench's threads. You can always cut the stripped end off with a Dremel tool and a cut off wheel or you can buy a set of allen wrenches. Unfortunately, there are parts that are metric and there are sae threads. Get a set of both and keep them in your flight box when you aren't building. Allen wrench drivers are very handy.
Screwdrivers
You will need screwdrivers, flat and Phillips heads. Get large and small sizes. I have one small screwdriver that has several differnt kinds of tips hidden in the handle. Just pop the top off and pull out which tip you want and replace it.
Rulers and Squares
To get accurate cuts, you have to have accurate tools. Get some straight edges at your local hobby shop or hardware store. Plastic drafting triangles can be very useful tools too. Carpenter's squares and t's can be purchased at any hardware store.
Pliers, Wire Cutters, Vice Grips
If you have a Harbor Freight near you or in a town near you, give them a visit and stock up on inexpensive tools! Buy a set of small pliers. The sets usually come with five or six different kinds of pliers, long needlenose, curved needlenose, wire cutters, blunt nose, etc. These are some tools that you definitely need. Don't pay more than you would at Harbor Freight.
Epoxy Brushes, Mixing Sticks, Dixie Cups
Another thing I buy at Harbor Freight are epoxy brushes. They have round, hollow alminum handles and are desposable. For fiberglassing a fuselage or for brushing epoxy into your fuselage to fuelproof it, these things are good to have. Mix your epoxy in a Dixie cup, mix it with the brush or with wooden popsicle sticks or tongue depressers and when you are finished, throw it all away!
CA Adhesives
One of the greatest innovations in all of model aeronautics was the advent of CA (cyanoacrylate) glues. I can remember using Elmer's white glue to build airplanes with. It was heavy, didn't have much bonding power and it took forever to dry! I like to build quickly and when CA came out, no one new for sure how strong the bond would be. One of the glue companies took a .40 sized RC plane and crashed it full speed into a brick wall. Examinations of the pieces showed that most fractures were in the wood and not the glue joints. From that point on, builders could build with a sense of security with CA glues. I love CA because it does allow me to build quickly. Half the things I used to have to either pin or clamp, can be hand held while the glue cures. CA glues come in several different varieties. Thin can be used to penetrate joints and is what I use overall. Medium and thick CA's are used to fill gaps and I like to use them to glue difficult joints like plywood. When you want the CA to setup more quickly than what you are getting, use some accelerator. Spray it on the glue and it sets almost immediately. If you need to fill a gap, rub a little baking soda in the gap and squirt some CA on it. If you are out at the field, use a little fine dirt and do the same thing. You can also get "de-bonder" that is useful for desolving the glue.
I have glued my fingers together on several occasions. Sometimes de-bonder can be helpful but most times I haven't had a lot of luck with it. What I do, if I can, is take a sharp razor blade and slice carefully between my fingers. Sometimes there is no way to do this without cutting yourself. In those times I run some warm water over my fingers for a few minutes patiently trying to force my fingers apart. They will eventually come apart but sometimes it takes awhile.
I do 95% of my building with CA glues and have never had any problems with it not working like it should have. I have been hesitant to use CA hinges which are all the rage now. Just this week I saw an aileron that pulled out of a wing in flight due to some flutter and most of the hinges did not have glue residue or wood on them, like they were not bonded properly. I have almost always use plastic hinges and the drilled a hole through both surfaces that the hinge inserts to and then drill a hole and plug with a toothpick. Then I trim the toothpick and put a drop of CA on each peg.
CA hinges are satisfactory in some instances, slow trainers for example. But, in high perfornance, fast aircraft, I would still be hesiant to use them. My Extreme Kaos design is using large ailerons and a short wing span for fast roll rates. I will not take a shance of using CA hinges on it.
For use on styrofoam, be sure to use foam save CA glues.
Epoxy
I don't know how long epoxy adhesives have been around but they are an essential part of building any RC plane. There are several different types of epoxys. There are epoxys that can set up in five minutes and then there are some that take 24 hours to set up. I don't know if there is any proof to this but it seems to me that the longer the epoxy takes to set, the more powerful the bond. A 24 hour epoxy seems to give a better bond than a five minute epoxy. When building, I prefer to use a 30 minute or 45 minute epoxy.There are times a five minute epoxy is good to use. At the flying field the 5 minute epoxy can get your plane back in the air after some quick repairs but for building, use the longer setting epoxys. You can buy small tubes of epoxy and syringe type tubes of epoxy at the local hardware store. I prefer to buy the larger bottles of epoxy at the hobby shop. Try to keep epoxy use to a minimu since it is heavy.
I like to finish balsa fuselages with fiberglass clothe that weighs approximately .56 ounces per square yard. I drape the clothe over the structure and then brush epoxy into the clothe. But first, I mix some denatured alchohol with the expoxy to thin it out. If you don't thin it, it tends to stick to the clothe and pulls it making it harder to work. The thinned epoxy also keeps from having brush marks that have to be sanded out later. A word of caution though, if you use too much denatured alchohol, the epoxy may have a hard time bonding and hardening. With the alchohol, the epoxy will seem sticky for longer than the specified cure time but it will harden.
For metal repairs, try using JB Weld brand epoxy. It is available at most hardware stores and Wal-Mart. This stuff is very strong and will bond things that most other glues won't.
Thinned epoxy can be used to fuel proof areas of your airplane. I like to thin epoxy just like I would for fiberglassing purposes and then coat the area inside the cowling and inside the fuel tank and radio compartment. It seems like with about any RC plane, you'll get fuel inside the cowl and the fuel tank area. You don't want your balsa soaking up the fuel.
Aliphatic Resin Glues
This is a yellow shaded wood glue. A common brand is Titebond. This is good glue for wood but is heavier than the CA glues and takes longer to set. I like to use aliphatic resin glues for gluing fuselage doublers inside the fuselage. I spread the glue as thinly as possible and glue the pieces together. Before CA glues, aliphatic resin glue is what most builders used to build their airplanes.
Gorilla Glue
Now this is some good stuff but I wouldn't use it in too many places in a model airplane. This glue makes for great bonds but it is heavy and to work at its best, you need to slightly wet both surfaces to be glued. The only real problem I have with Gorilla glue is that it foams as it sets and once it is dry, the residue is hard to sand. I haven't used it a lot in RC use but I'm sure there are some places it would be an excellent choice.
Contact Adhesives
There are several brands of spray on contact adhesive. Spray each surface to be joined with a light coat of the adhesive. Let it set up and then carefully join the two pieces together. I use this type of adhesive to fix sandpaper to my aluminum T sanding block and to wooden sanding blocks that I have made. When I need to remove the sandpaper, I peel as much of it off as I can, then spray it will electrical contact cleaner spray which is available at Lowes and as it soaks into the paper, I peel the rest of it off.
One excellent glue to glue wing skins to foam wings wasDave Brown's Southern Sorghum. Unfortunately it may not be available any longer. Searching the Internet, I saw a post that "Liquid Nails" has a water based contact cement much like Southern Sorghum. If this is the case, it should be available at hardware stores. Care must be taken not to use a contact cement that will destroy foam wing cores.